Indoor composting is a noble way to make the earth more habitable. Every year billions of tons of food waste are generated around the world.
What can be more satisfying than converting this enormous amount of food waste into a healthy and nutritious diet for our plants? Here is where composting comes into play.
Composting is a method that has been extensively used to convert this biodegradable food waste into compost. What’s great is that it can work almost anywhere, from a large kitchen to a small apartment. You don’t need a lot of land or outdoor space like in other forms of composting.
Here, we’ve talked a lot about composting, how it works, its benefits, its different methods, and how commercial composting facilities help to make the planet a better place.
But today, we will discuss indoor composting: a topic that concerns many altruistic minds.
We will see how exactly you can turn your household waste into compost and prevent it from filling up the landfills and polluting the globe.
So, if that intrigues you, here’s everything you need to know about indoor composting.
Indoor Composing | Everything You Need to Know!
Whenever we talk about composting, a picture of accumulated waste comes into mind, whether it is piled in a backyard or on a large-scale composting site.
You can still compost if you don’t have access to a backyard, you live in an apartment or a shared space, or simply don’t want to compost in an open environment usually have a question in mind.
Can You Compost Indoors?
Well, the answer is: of course!
Indoor composting is actually “simple” compared to large-scale composting. You don’t need a massive space, not even a backyard.
Also, a benefit of indoor composting compared to outdoor composting is that you won’t need to take care of the changing weather conditions.
You can just collect the green and brown wastes from your home in a compost bin and make compost out of them. You can also use electric composters or worms to speed up the process.
There is also an anaerobic method that won’t require oxygen. We’ll talk about all the methods further in the article.
As I said earlier, indoor composting is relatively simple and comes with some benefits of its own.
What Are the Benefits of Indoor Composting?
We’ve talked a lot about the benefits of composting in general. But today, we’ll be talking about the benefits of making compost indoors.
- While composting indoors, you won’t need to take care of the changing weather conditions, for example, excessive sunlight and heavy rainfall.
- Indoor composting allows you to make compost in a confined space. You just need a small kitchen counter to carry out the process.
- Indoor composting includes the most simple methods of making compost. Almost all forms of indoor composting require little to no effort.
- And finally, with indoor composting, you’ll make premium quality compost which, by the way, your houseplants will love.
That aside, let’s see how exactly indoor composting works.
How Does Indoor Composting Work?
The working of indoor composting is the same as outdoor composting.
As we know,
“Composting is defined as the process in which compostable organic matter (green and brown waste) is broken down to form compost in the presence of water.”
Basically, there are three ways to compost, whether they are executed indoors or outdoors:
- Aerobic composting.
- Anaerobic composting.
- Vermicomposting.
It involves accumulating and storing green and brown wastes for a particular period inside a container, during which the aerobes, anaerobes, or worms break them down into compost.
Indoor composting, similar to outdoor composting, involves different methods. But before getting into the methods, you must know what you can compost indoors.
What Can You Compost Indoors?
If you are ready to dump some waste into a compost bin, you must know what to put in and what not.
You can compost:
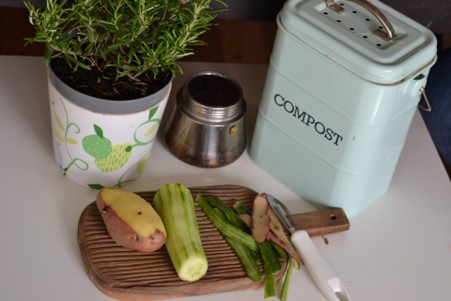
- Food scraps (including fruit flesh and vegetable peels).
- Eggshells.
- Yard trimmings.
- Houseplants.
- Coffee grounds.
- Tea bags.
- Nail clippings.
- Hair.
(Brown Wastes)
- Dried leaves.
- Nutshells.
- Pine needles.
- Wood.
- Bark.
- Shredded paper (newspaper, cardboard, etc.).
- Cotton.
- Sawdust.
- Hay.
- Straw.
You should not add:
- Cooked food.
- Food that has gone bad or rotten.
- Dairy products.
- Fats and oils.
- Meat.
- Fish or fish products such as bones.
- Pet wastes.
- Chemically treated garden trimmings.
- Non-bio compostable items such as plastic bags.
As far as the ingredients are concerned, you should keep a couple of things in mind:
- First, you must add the green and brown wastes in the correct ratio for aerobic composting. Add two to three parts of green waste (or use your nose) for every part of brown waste.
Indoor Composting | All Methods Explained!
Three indoor composting methods are generally mentioned depending upon the three ways to compost.
These methods are:
- Using countertop compost bins.
- Indoor worm composting.
- Bokashi method.
Let’s take a look at them, one by one.
Countertop Compost Bins
Countertop compost bins are most commonly used for indoor composting. They are easy to manage and require little to no work.
There are actually two forms of countertop containers.
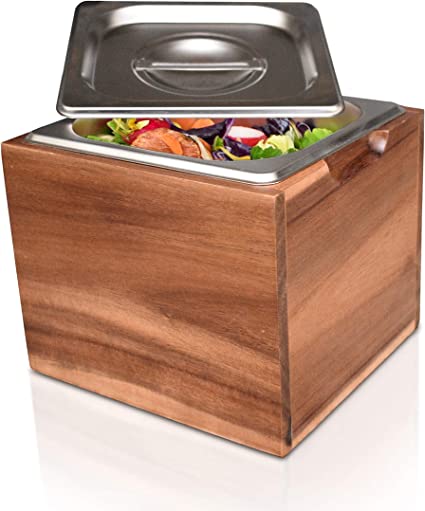
General Countertop Compost Bins or Tumblers
The traditional composting bins are typically used to make compost indoors. Similarly, a tumbler is a rotatory bin that comes with a handle and is easier to turn the compost.
Different types of compost bins are made up of plastic, metal, or wood. Plastic and metal bins are most commonly used for composting.
They come in different sizes. Therefore, you can choose one according to your needs. The standard size of 18 gallons is adequate for a family of 4–6 people.
However, if there are just 2–3 persons in your family, you can choose a size between 5–10 gallons according to the amount of weekly household waste.
Compost bins work on the principle of aerobic composting, meaning the wastes are decomposed by aerobic microbes. Therefore, these bins would require a proper supply of oxygen. Otherwise, the aerobes won’t be able to survive.
That’s why people drill holes in the bins to maintain proper aeration.
Let’s see how the process works:
- First, you need to determine the size of the container and the location where you’ll place it.
The container should be placed away from the reach of pets and children and should not come on the walking path to prevent it from tumbling down.
It should fit in the place, and the size should match your needs.
- Once you find a suitable container, it’s time to drill holes.
- Drill a few holes below the container and up on the lid. These holes should be equally spaced and can be at least 2 inches apart.
The holes on the lid help to provide proper aeration, and those below the container will drain excess water.
- Now, it’s time to add in the waste. You can add any of the things mentioned above in a balanced way. Try to add more “browns.” You can maintain a brown to the green ratio of 2:1 or 3:1.
- Now, place the container at your desired place. As you drilled some drainage holes at the bottom of the container, you’ll need to put it on a tray to collect the drain.
- You’ll need to turn the composting material once or twice weekly to provide the contents with proper aeration. Also, make sure to maintain a balanced temperature and moisture.
- Your compost will be ready in a couple of weeks.
Now, let’s take a look at the other type of composting containers.
Indoor Composting Machines or Electric Composters
These are the most effortless indoor composting devices.
Indoor composting machines or electric composters generally dehydrate, compress, and turn the waste material to make a chunk of compost boosters that could be added to compost piles to speed up the process.
But some special electric composters, such as Lomi, can take that to the next level. In addition to maintaining the proper moisture, aeration, and temperature, they crush the composting material and filter it into nutrient-rich plant food!
Let’s see how the process works:
- First, you need to buy an electric composter. Most of them come in relatively small sizes and are suitable for most kitchen counters.
- Once you have the machine, you must add the compostable materials. You can add any type of green and brown waste as mentioned above. However, if you are using Lomi, they have a list of Lomi-approved products that can also be composted.
- Once you have added all the ingredients, just click the button, and you are good to go.
- You’ll get finalized compost in 24 hours.
The second method is indoor worm composting.
Indoor Worm Composting
On this site, we’ve talked a lot about vermicomposting.
In case you haven’t heard of it.
“Vermicomposting involves the breaking down bio compostable materials with the help of segmented worms.”
Sounds simple, right?
The whole process is carried out in worm composting bins, also known as vermicomposters. They are inexpensive and easy to maintain. You can also use any kind of composting container or bucket to carry out the process.
Let’s see how the process works.
Working
Here’s how to make vermicompost at home:
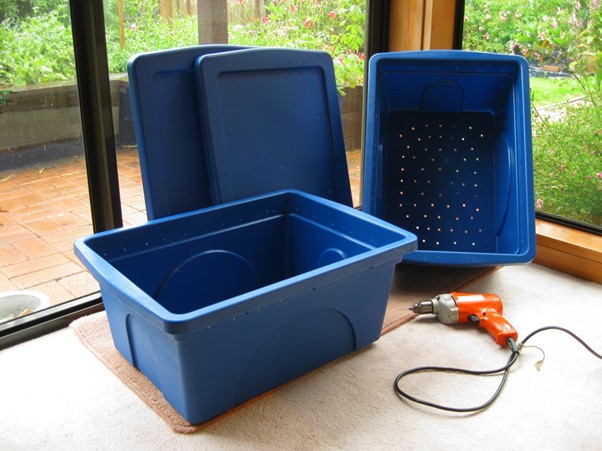
- First of all, you need 2 containers. The first one should be taller and the second one should be wider and shorter.
- Once you have both containers (selected according to the location where you’ll place them), drill holes in the taller container.
Drill 2 holes (both 1 inch in diameter) two inches below the top on either side of the taller container. Furthermore, drill 4 holes (all 1/8th inches in diameter) near the bottom corners. The holes are necessary to provide the composting material with proper aeration and to drain excess fluid.
- After you drill the holes, seal them with waterproof vinyl screening, and use waterproof glue for that purpose.
- After everything is done, place the taller container into the shorter and wider one.
- The taller container will have the composting material and the worms. But you don’t add waste and worms directly into the container.
- First, you need to nurture the worms for a week.
- Fill up the taller container with equal amounts of garden soil and shredded paper. Spray the mixture with water until it is adequately damp.
- Now, add in the worms.
As far as the number of worms is concerned. You must buy them according to your needs. Each pound of red worms can eat and digest half a pound of organic waste daily. So, you’ll need a pound of red worms for a weekly harvest of 3.5 pounds of waste.
- Once the vermiculture is stabilized, you can start adding in your household waste. You can add grass clippings, food scraps, paper, tea bags, coffee grounds, etc. Make sure you add small chunks to make it easier for the worms to digest.
- After you have added your composting material, you can cover it with some finished compost or dirt. That will keep foul odors and fruit flies away.
- You can harvest the worm castings (high-quality compost) on a weekly basis before adding in the next batch of compostable material.
- You’ll also need an extra container to store your household waste until you harvest the last week’s compost.
- Also, schedule to remove the drain collected in the shorter and wider container. It’s known as “compost tea” and really benefits your plants. But, make sure you only use the compost tea that doesn’t contain harmful microbes.
Now, let’s head to the last method of indoor composting.
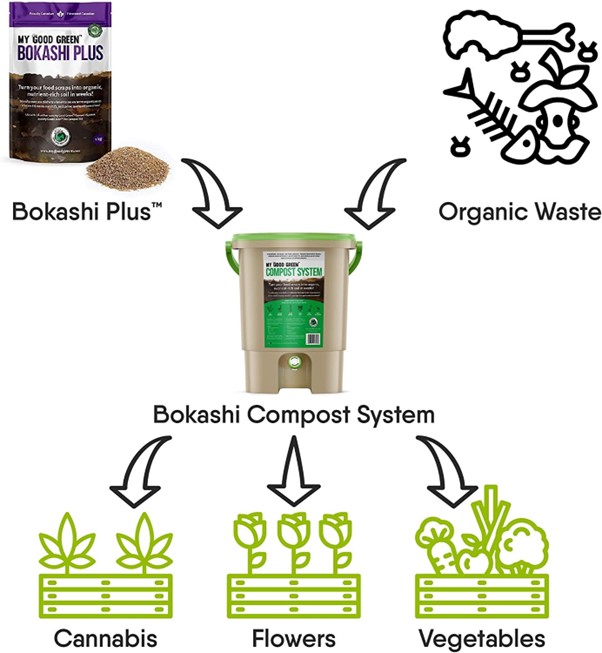
Bokashi Method
The Bokashi method is one of the cheapest and most effortless indoor composting methods.
It involves the anaerobic breakdown of organic matter into compost through fermentation. Yes! It doesn’t require air.
You won’t need to turn the compost, and if you buy already inoculated bran, you won’t even need to put in any effort.
Airtight Bokashi bins come with a siphon to drain out the leachate.
I recommend that if you buy one, you should also purchase pre-inoculated bran with it as well. Otherwise, you’ll have to mend the raw bran with molasses and EMOs, which can take up to a month.
Working
Here’s how the Bokashi system works:
- Once you have purchased your Bokashi bin and bran, you are ready to compost.
- Add a layer of Bokashi bran into the bin. Keep the layer a couple of inches thick.
- On top of the bran layer, you’ll add a layer of your composting material. You can add any of the green and brown wastes mentioned above.
The Bokashi method also allows you to compost materials such as meat scraps, fish products, and dairy products that are not permitted by aerobic systems. But make sure you add them in short chunks and small quantities.
- Keep the layer of your waste material 2–3 inches in height.
- After that, cover the waste with another layer of Bokashi bran. Use enough bran just to cover the food layer.
- Once everything is added, cover the lid and don’t open it for at least 2 weeks.
- Use the siphon to drain excess water or leachate.
- After two weeks, take out the fermented compost from the bin.
- This compost is not ready for your plants because it is still very acidic.
- To finalize the finished compost, bury it under the soil. You can use a container for this purpose or carry it outdoors.
- Wait for another two weeks.
- After that, your compost is ready to be used for plants.
These were all the methods of indoor composting. Now, I will tell you some expert tips to help you in your indoor composting journey.
How to Be Successful at Indoor Composting?
Here are a couple of tips that would help you in becoming a pro at indoor composting:
Balance
I must have mentioned this once in an article:
“Composting is all about balance.”
The key to making good-quality and healthy compost is maintaining a proper balance of water, aeration, temperature, and green and brown wastes.
- An adequate number of drainage holes and scheduled watering can prevent the mixture from becoming soggy.
- Frequently turning the compost would keep it properly aerated and helps to dissipate excessive heat from the mixture.
- Indoor compost systems larger than 10 gallons can heat up to 40°C–50°C in two to three days. According to EPA, most harmful pathogens in the compost are killed if the temperature is maintained at 40°C for five days.
- In vermicomposting, the ideal temperature is around 13°C–26°C for the worms to remain active.
- And finally, you should always keep some carbon-containing brown wastes to add to the mixture beforehand.
The second important thing to consider is:
The Size of Compostable Materials
Smaller chunks are easier to break down.
- Try to shred down the larger pieces of content into smaller portions whenever possible.
- Smaller chunks provide a greater surface area for the aerobic and anaerobic micro-organisms to act and break down the matter.
- Moreover, it is easier for worms to eat and digest tiny pieces of organic matter.
With that said, let’s answer some of the frequently asked questions.
Conclusion
I must say that the fact that we can make healthy and nutritious compost from food waste is just amazing!
If every household participates in this beautiful work, we can not only reduce massive amounts of food waste going into the landfills but also nourish our gorgeous green gems.
We’ve talked a lot about indoor composting.
Let me summarize:
- We learned how we can make compost indoors, the benefits of making compost indoors, how it works, and what types of materials we can compost indoors.
- Moreover, I explained all of the indoor composting methods to you in detail.
- We shared a couple of tips on how to be successful at indoor composting.
- And finally, I answered some of the frequently asked questions.
Frequently Asked Questions About Indoor Composting
Here are the answers to some common questions regarding indoor composting.
Is Indoor Composting the Same as Outdoor Composting?
Yes! The processes involved in making the compost are the same.
Outdoor composting also involves the breakdown of organic matter into compost. It also involves three different types of processes—aerobic, anaerobic, and vermicomposting.
The only difference is in the equipment, location, and extent.
Is Composting Indoors Safe?
Yes! Indoor composting is absolutely safe.
As long as you maintain a proper balance between green and brown wastes, no harmful or smelly gases are released into the environment.
It is an efficient way to turn household waste into nutrient-rich compost.
Does Indoor Composting Smell?
Indoor composting never smells if done correctly.
Make sure you maintain a proper green and brown waste balance. Ensure to maintain appropriate aeration and moisture levels. And don’t keep wastes sitting in electric composters for days.
That was all about indoor composting.
On that note, let’s head towards the conclusion.